Pages

Translate

Showing posts with label money. Show all posts

Sunday, December 21, 2014

Our Chore Chart and Elementary School Commission System

Being done with school for the past 6 months has afforded me the chance to do more pleasure reading and catch up on non-fiction reading that I've been putting off.

Lately I finally read through Dave Ramsey's books, The Total Money Makeover and one of his newer books that he wrote with his daughter, Rachel Cruz - Smart Money, Smart Kids.  I've listened to Dave Ramsey's radio show for quite some time, so the theories weren't new to me, but it was nice to see everything laid out in the book with lots of personal stories to break up the information.

The Smart Money, Smart Kids book was really inspiring too.  I've long watched my two boys often acting as though they deserve to have things handed to them, and I wanted to change that.  It's funny that they could even act entitled to anything, when they've spent so many years of their lives having to hear that "it's not in the budget".  The book gave me lots of great ideas to start incorporating now when they're at the tender young ages of 6 and 8.

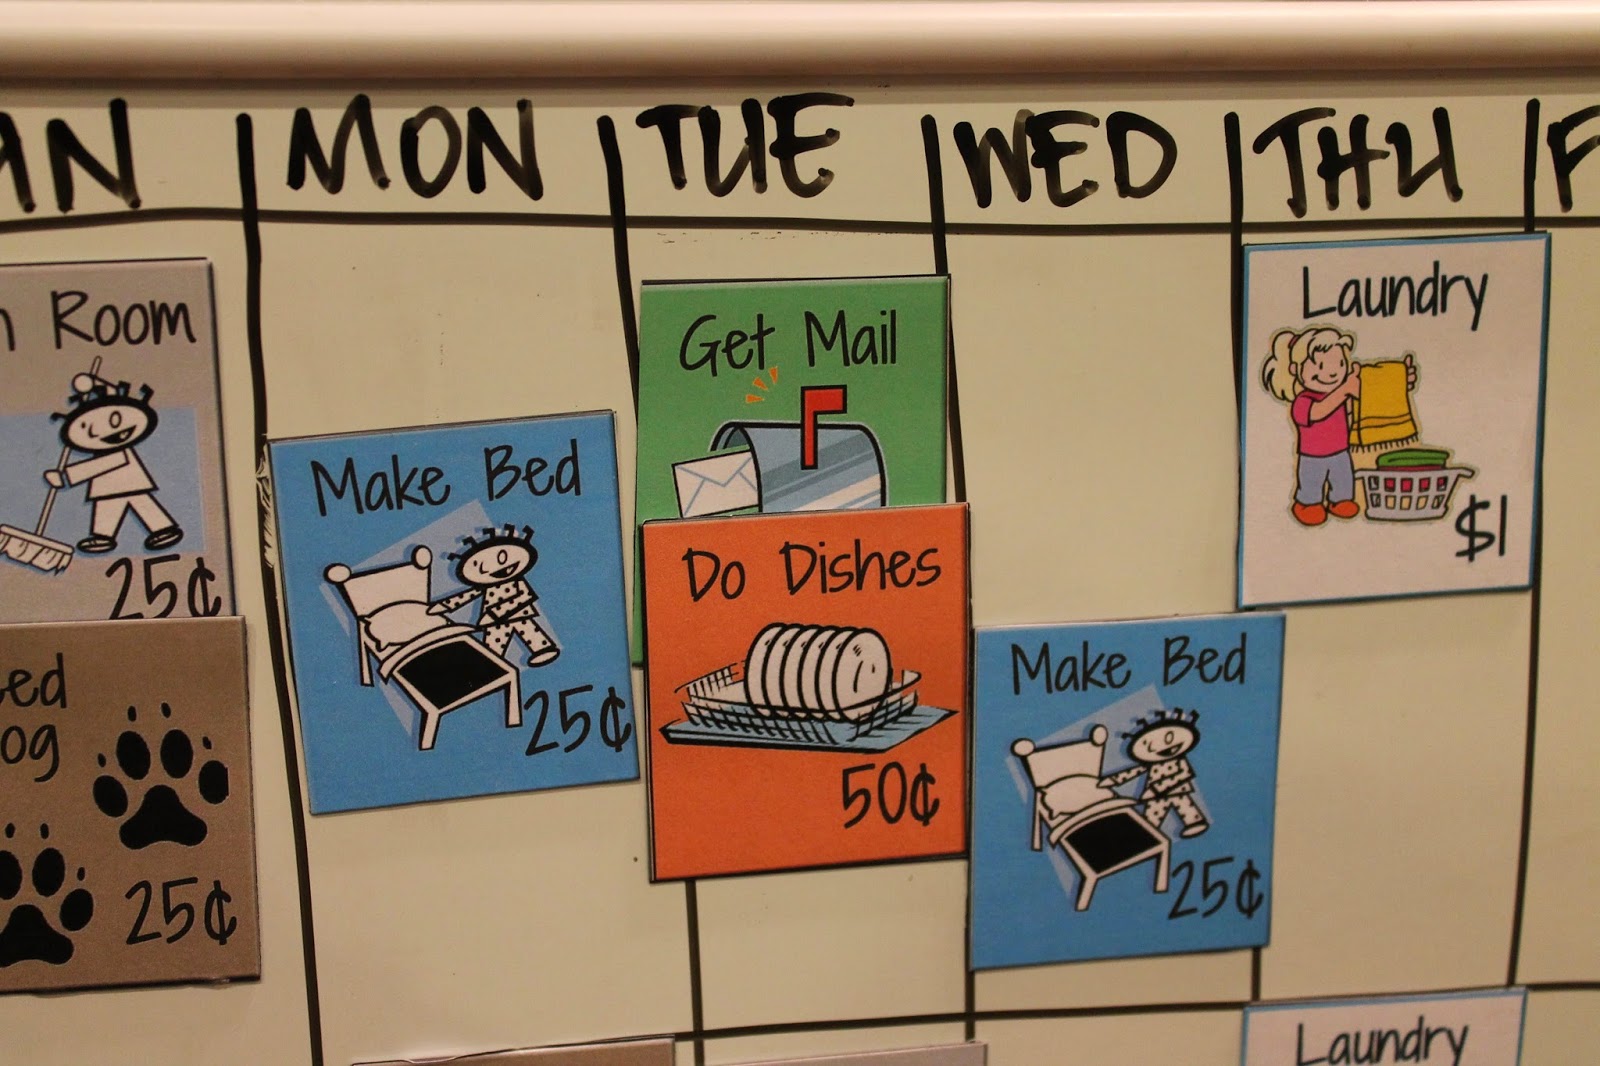
The most important idea, for me, in the book was teaching them that money comes from work.  There would be no "allowances", or entitlements.  Instead, we would offer them commission.  We put together a set of chores that could be done each week.  Some on a daily basis and others just 1-2 times per week, and each with a set price tag.  Each day when they completed a chore, they would mark it on the chart and at the end of the week they have to count up what commission they are owed (this is also great for helping them become better at counting money) and then they are paid in cash.

I took a couple pictures of the chart I created and then list of chores we make available, just give others some ideas of how to get started.  I created our chores and put them on magnetic business cards that I had cut in half.  I opted to use just plain paper for the chores themselves because it allowed the magnets to have enough power to stack/stick to each other, thus taking up less space on the fridge.  I made enough magnets for the maximum number of times that each chore could be done each week.


If you would like to use the chores I created, you can download the pdf that contains these 4 pages of the chores as seen above.

Then we picked up a dry erase board that measured 14 inches wide x 11 inches tall.  This actually worked out to be a perfect size because there was just enough room for each day to have a space that was exactly as wide as each chore magnet.  There certainly are lots of ways to put a chart together, but I will say after a few months of putting this in place it continues to go amazingly well.


We haven't had the most success so far with convincing them to spend, save and give.  My 8 year old does a great job of selecting something he wants to save up for (totally thought he would have been more of a spender than a saver), but then doesn't want to use one cent for anything other than saving up for his goal purchase.  He also doesn't seem to "in to" giving.  We've done a better job of demonstrating giving, by picking up some non-perishable foods to give to a food drive or donating out-grown clothing to the thrift store, but neither of them really want to part with the money they worked hard to earn.  I'm sure with gentle persuasion it will come.

It certainly has stopped a lot of crying and whining fits that used to result when they were denied something that they felt they really needed to have.  We had an instance of this about a month ago.  My 8 year old had seen a pair of shoes someone else got, and desperately wanted a pair.  I told him we had just bought him shoes and that we were not spending more money on shoes for him when he hadn't outgrown his and simply didn't need them.  He threw a momentary tantrum and then he decided he would print out a picture of the shoes he wanted, and would do extra chores to save up for them.  After a month of hard work, and with a generous holiday gift card, he was able to purchase the shoes himself.

There are a few things that money cannot buy, and one of them is the look of pure delight and satisfaction when his dedication has enabled him to purchase something he wants that we were not willing to provide for him.

Now I Remember Why I Hate Trying to Sell a Car

Selling a car can be a pain in the butt.  Not as stressful as buying/selling a house, but it's typically the next most expensive thing we seem to own and selling one is such a headache.

We recently listed our 2012 vehicle for sale.  Nobody seems to read the newspaper anymore so we are sort of forced to list it online as putting a sign on it will reach no-one (we live at the far end of a cul-de-sac).  Back in Maine we had more options aside from just Craigslist, we had the fabulous Uncle Henry's Swap/Sell Guide - best place to find the weirdest things.  So we cleaned her up, took some nice pictures, and then put together the most comprehensive description and put her out there on Craiglist in hopes someone would want to snatch her up immediately.

It's been a while since we listed a car for sale that was worth anything.  So I had pleasantly forgotten about all the scammers from Nigeria that start to roll in when you list a vehicle for more than $20K.  Last time we did this it was a truck.  We were contacted by the usually scammer, suggesting they had a buyer and would send us a cashier's check for more than our asking price.  We were then supposed to cash the check and the extra funds were to be paid to an auto shipper of the buyers choice.  I knew it sounded fishy, so I declined the deal.  A week later an envelope arrived with a huge cashier's check, and nothing else.  Apparently their broken English not only made it difficult to speak the language, but also to understand the word "NO!".  Out of curiosity I took the check to the bank.  I knew it couldn't be legit, but it sure did look real.  My credit union dug around and ultimately called Bank of America (who was supposedly the creator of the check) and discovered that the color of the check (I think it was blue) was wrong for BOA as their cashier's checks are green.  So the gist of the scam is that they send you this check, you cash the check and send on the funds for the shipping (if you're trusting soul) which is around $3000-$5000, and then the check never clears the bank (because it was fake) and you are now out the $3-$5K.

Well now they've advanced their technology.  Now the scammers are still at it with the same old scam, but try to lure you in by saying they can pay you via paypal; as if this is a safer transaction.  There have to be a ton of marine biologists working on off-shore rigs (thus unable to come to pick up the vehicle) and a whole bunch of really generous engineers who are on business trips to Boston and wanting to purchase the vehicle for a relative out of the goodness of their heart.  Unfortunately, for them, I'm not a sucker.

First, nobody calls you up, after seeing your vehicle listed with every detail imaginable, and asks what condition the vehicle is in... and then takes you at your word.  Second, nobody tells you that they have a buyer for your vehicle that is willing to pay exactly your asking price and a few thousand on top of that to have it shipped to them (because this is not a classic car we're talking about, it's a mass produced 2012 Dodge Journey!).  Third, if you select the name "Gary" as your uber American name, you best be able to pronounce it!!!  Fourth, if they want you to make a transaction via paypal this whole thing is fraught with trouble - 1. Someone has to pay the transaction fee, right?  Well don't you think that would be a large amount if the money transferred to another person was over $20,000?  I sure do.  So the fee to wire funds directly to a bank account would be much less expensive and if you suggest this as the only option you'll entertain, you won't hear from them again.  2.  They are wanting you to make the transaction via paypal and asking as though this offers some sort of safe-guarding for this transaction.  IT DOESN'T!  Paypal doesn't protect purchases of vehicles made off of Ebay, and I'm sure if I continued digging deeper I'd find a notation that indicates it doesn't protect vehicle purchases made anywhere.

The most recent phone calls I've received were a recording saying they were interested in my "classic car" listed online.  Classic?  A 2012 Dodge?  What?   Ugh.  This whole ordeal is enough to make you never want to do anything but buy a vehicle and drive it into the ground so you only have to deal with buying from someone and then carting it off to the junkyard in the end.  Clearly these soulless @$$-clowns are making money off people somewhere, otherwise they would have moved onto a new scam, so if you're looking to sell a car, be on the lookout.

Wednesday, November 19, 2014

Fixing the Windshield

So my husband and I decided that as part of our journey to become debt-free (I <3 Dave Ramsey) we would sell our crossover SUV.  We really like the car, and thanks to the new job I took back in June, the payment is do-able.  But I just don't want to DO it anymore.  I'd much rather just drive around a piece of garbage car, with mismatched doors and an 8-track radio than shell out this car payment every month... just to ride in luxury... and look like we're winning when in fact we've only just now stopped drowning!

Anyway, I digress.  So to get the car ready for the market, we want it to look its best.  And as luck would have it, I was driving the other day and the truck ahead of me threw a rock at the windshield and gave me a tiny little spider-like ding.  CRAP!  No matter how good the car looks, anyone who gets behind the wheel is going to see that chip and instantly the car will be worth less in their minds.

I picked up a RainX Windhsield Repair Kit.  It looks like it will fix those little spider marks, and bullet marks, you name it... as long as it's not too massive or longer than 12-inches.

First I cleaned up the chip with some Windex.  If there are any little fragments of glass still in it, they suggest that you clean those out with a razor blade.  The kit didn't come with a razor blade, so be sure you have one handy before starting the process, because you'll need one at the end.
Chip clean and ready for repair.

Next step is to fasten this little suction cup device to the windshield with that middle hole centered over the problem spot.

Then you'll screw in this little bolt-like thing.

Go until the end is flush against the windshield.

Squirt a few drops of epoxy stuff into the tube.  They said 3-6 drops depending on the size of the problem.  Mine wasn't all that big, but I went for the 6 drops just because it seemed a little deep and hollow.

Then follow that up with this smaller bolt that screws into the threads within the bold that is already in place.  This one is driving the epoxy down into the crack.  One you have it cranked pretty much all the way on, check from inside the car.  You may still see some little air bubbles.  Back out this screw to release the air, and then screw it back on again.  If you still see air bubbles, add some more of the epoxy and then I used a heat gun on low heat from inside the car to help draw the epoxy into the crevices.

Let it sit for a few minutes.  Then turn the bolt (and inner bolt) about 1/2 turn counter-clockwise to release them from the windshield.  Then remove the whole apparatus.  I then placed another drop of epoxy on the top of the ding and put down the plastic sheet that came in the kit.

After a few more minutes of letting the resin set, while the car was positioned in the sun, I removed the plastic piece and used the razor blade to scrape off the excess epoxy.


I honestly had a really hard time taking the final picture, but I cannot see where the spot had been.  So I'd say that was a pretty successful project, done in 15 minutes, for a whopping $15 or so.


Monday, September 29, 2014

getting super clean

"I was wondering whether you had a few minutes to talk about a little laundry detergent."  ahhhh, I love "the 40 year old virgin".  Great, great movie.  But I digress...

I ran out of laundry detergent today so I figured that while I was making another batch I'd share my super secret recipe.  We have an old-school washer/dryer set - meaning no fancy HE (high efficiency) models in this abode.  Seems like for the higher efficiency ones you need less sudsiness.  Is that a word?  But I don't see why the recipe wouldn't work for those models too as, yes it makes some suds, but nothing compared to what my box of Tide used to do.


Here goes.  You're going to need a box of Borax (I found that easily in the laundry section at Walmart) and a box of Washing Soda.  This is different from Baking Soda in that the crystal is larger.  I guess that makes it better at washing.

Then you'll want a little something to make it smell like fresh laundry, or you can go without.  For that purpose I had some of these Purex crystals laying around which I used.  You could use something like that, or I know some friends of mine who sell Scentsy offer some sort of ingredient you can add to laundry to make it smell like your favorite scents.  The Scentsy ones are called "Washer Whiffs".  I'm thinking next time I may opt for adding some essential oils (just a few drops at a time to the mixture and mix well to distribute), but this batch will last me quite a while so I have some time to think more about that later.

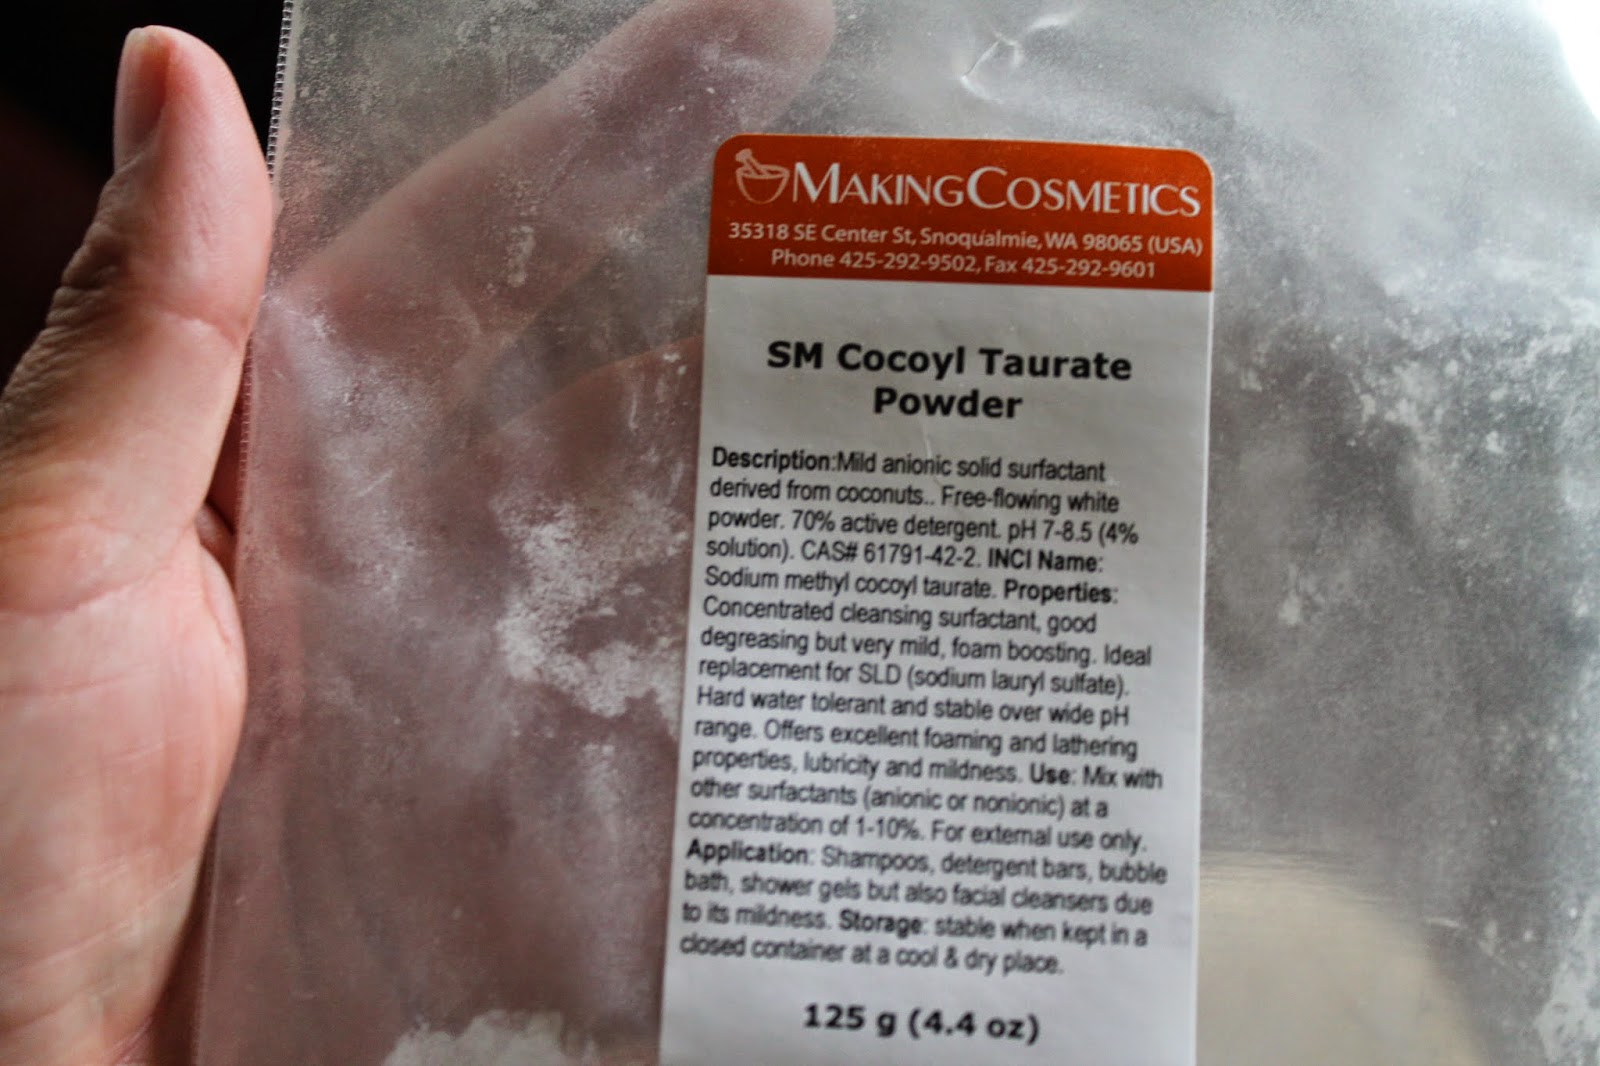
The final ingredient is one I had to do some digging for.  All the recipes for laundry detergent wanted you to grate a bar of soap into your concoction.  It's not that I mind the hard work of grating soap, but the instructions then go on to tell you that you have to start the wash with hotter water to melt the soap!  No way!!  I mean I started making this stuff to save money, and if I'm now having to use hot water that sort of defeats the purpose of making it because money saved in detergent was just wasted by heating up that water.  So instead I found a powder surfactant.

A surfactant is "a surface-active substance (as a detergent)" as defined by Webster.  In simpler terms, the surfactant is what breaks the bond of the dirt to your article of clothing.  Same applies when you wash your skin and you want to break the bond of the dirt to your skin - it's the surfactant that does this.  The grated bar of soap contains a surfactant, so that's why most recipes called for it, and it's easy to find at the local store.  For my purposes I chose a mild surfactant called Cocoyl Taurate.  I found it online at a cosmetic manufacturing supplier called Making Cosmetics, but then I also found it on Amazon.com which is super easy especially for those of you who have a prime membership, or were planning to order your other ingredients from them as well.


So the recipe I used was...
  • 3 cups Borax
  • 3 cups Arm & Hammer Washing Soda
  • 1/2 cup Purex crystals
  • 1/2 cup Cocoyl Taurate


First I mixed together the borax and the washing soda.  Mine had been sitting since the last time I made a batch, so they were slightly clumpy, but the clumps break apart really easily when I stirred the mixture with a wooden spoon.  Then I added the scented crystals.  Once the first 3 were mixed well I added the cocoyl taurate.  Don't drop this one from high up, add it so it barely moved from the measuring cup onto the other ingredients.  You want to keep it from becoming airborne as much as possible because that stuff will make you cough and hack a bit.  It's just a super light ingredient.  Also stir it in slowly, almost more like you're folding it into the other ingredients... again this is to keep from stirring up a lot of dust.


and BAM!  You've got laundry detergent.  It won't look like a ton of detergent, and you may find yourself doing some calculations in your head to figure out if it really saves you any money.  I believe if I added up the 2 boxes, the scented crystals and the surfactant, it might run me about as much as my usual box of Tide.  But what you'll find is that you only need 1/4 as much to do a full load and everything comes out incredibly clean and fresh.


As a side note, these canisters (below) are super cute.  Kind of like the one I use, but even better as they have a spoon attached to the side so you could easily measure out your detergent with it.  The important thing is to find one that's airtight to preserve the freshness of your detergent and to keep humidity from making it clump up.

Wednesday, July 30, 2014

The Money Boot

Money is officially the dirtiest, nastiest stuff around.  And now I have just one more reason to think this.  I thought these were just a pair of rubber boots.  Perfect for splashing in puddles (not that we've had any of those in months).  But apparently I'm dead wrong.  What you see before you is what my (now 6 year old) calls his "money boot".

Some people put money in their wallet, some in their purse, some in a piggie bank.  He puts his money in his boot.  I wasn't sure what he meant until I heard him walking around in them yesterday and you could her what sounded like the jingling of a little change purse.

Me - "Hey buddy, why don't you put your money in your bank?"
Him - "Nope, I put it in my money boot!"

And he removed his boot (like I couldn't hear it) to show me that not only was he not wearing any socks - so gross in unbreathing, black rubber boots - but also was carrying around the sweatiest looking dollar bill I've ever seen; and that's saying a lot as I've been to a few strip clubs.

Later last night they pleaded to be taken to the Convergence Zone (CZ) on the navy base so they could play a few video games.  I agreed, but only because I was super tired from working and didn't have the energy to entertain them.  Still in his boots, and a pair of shorts, looking like a hobo, they picked out a game that would entertain them for 30 seconds or so.  He sat down in the video game chair tipping onto his back with his feet in the air.  A shower of loose change was falling out all over him.  I giggled a little and went back to the book I was reading.  After about an hour it was time to head out.  I helped them pick up their Xbox controllers and spied a nickel he had missed.  Wouldn't want him to be missing that so I slipped it into his money boot.  But how dare me!  I had foolishly put the money in the wrong boot!!  I was educated, by my 6 year old, that the money boot was on the "yeft [left] foot".  Jeez, I'm so dumb.

We returned the game and I could not stop giggling the whole way out of the CZ and all the way home.  So while I'm glad that no matter how tired I am they can still make me snicker, I'm also glad they reminded me how much you want to sanitize your hands after you touch money.  Seriously, you never know whose boot it's been in.